Sentry をインストール
商用サービスもあるオープンソースのイベントログ収集ツール Sentry をインストールしてみたのでメモ。
getsentry/sentry
https://github.com/getsentry/sentry
Airbrake やオープンソースの Errbit 辺りと同じ系統のサービスな感じです。
インストールした環境は CentOS 6.5 x86_64 です。
MySQL のインストール
まずは MySQL をインストール。
5.1 で試したら途中 sentry upgrade 実行時にエラーになったので、公式リポジトリから 5.6 を入れました。
# yum install -y http://dev.mysql.com/get/mysql-community-release-el6-5.noarch.rpm
# yum install -y mysql-community-server mysql-community-devel
設定ファイルを変更。
# vi /etc/my.cnf
mysqld セクションに以下を追記します。
[mysqld]
character-set-server = utf8
mysqld を起動。
# service mysqld start
起動したら mysql_secure_installation を実行し root パスワードの設定などを行っておきます。
# mysql_secure_installation
mysql_secure_installation の実行が終わったら設定したパスワードでログインします。
# mysql -uroot -p
sentry 用の DB とユーザを作成します。
パスワード等は適宜変更して下さい。
mysql> CREATE DATABASE IF NOT EXISTS sentry DEFAULT CHARACTER SET utf8;
mysql> GRANT ALL PRIVILEGES ON sentry.* TO sentry@localhost IDENTIFIED BY 'sentry';
mysql> FLUSH PRIVILEGES;
mysql> exit
Sentry のインストール
setuptools をインストール。
# yum install -y python-devel python-setuptools
easy_install コマンドを使って Sentry をインストールします。
# easy_install -UZ sentry[mysql]
インストール完了までそれなりに時間がかかるので、しばらく待ちます。
インストールが完了したら、以下のコマンドを実行して設定ファイルを作成。
# sentry init /etc/sentry.conf.py
作成した設定ファイルを編集します。
# vi /etc/sentry.conf.py
以下の箇所を先ほど作成したデータベース接続情報に変更します。
DATABASES = {
    'default': {
        'ENGINE': 'django.db.backends.mysql',
        'NAME': 'sentry',
        'USER': 'sentry',
        'PASSWORD': 'sentry',
        'HOST': 'localhost',
        'PORT': '3306'
    }
}
また、設定ファイル内の SENTRY_URL_PREFIX の値をインストールしたサーバのホスト名または IP アドレスに変更します。
#SENTRY_URL_PREFIX = 'http://sentry.example.com'  # No trailing slash!
SENTRY_URL_PREFIX = 'http://192.0.2.1'  # No trailing slash!
設定ファイルを保存したら DB のマイグレーションなどを実行する upgrade コマンドを作成した設定ファイルを指定して実行します。
# sentry --config=/etc/sentry.conf.py upgrade
createsuperuser サブコマンドを実行して管理用のユーザを作成します。
# sentry --config=/etc/sentry.conf.py createsuperuser

!!!!!!!!!!!!!!!!!!!!!!!!!!!!!!!!!!!!!!!!!
!! SENTRY_URL_PREFIX is not configured !!
!!!!!!!!!!!!!!!!!!!!!!!!!!!!!!!!!!!!!!!!!

Username: akishin
Email address: akishin@example.com
Password:
Password (again):
Superuser created successfully.
これでインストールは完了です。
以下のコマンドでサーバを起動するとポート 9000 番で Sentry が起動します。
# sentry --config=/etc/sentry.conf.py start
軽く試すだけならこのままでも問題ないと思いますが、このままだと起動・終了が面倒なので、supervisord でプロセスを管理するよう設定します。
起動が確認できたら一旦 Ctrl-C などで sentry サーバを停止しておきます。
sentry を supervisor で管理する
以下のコマンドで supervisor をインストールします。
# easy_install supervisor
設定ファイルを作成。
# echo_supervisord_conf > /etc/supervisord.conf
作成した設定ファイルを編集します。
# vi /etc/supervisord.conf
ファイル末尾の以下の行をアンコメントし、ディレクトリパスを修正します。
[include]
files = /etc/supervisord.d/*.conf
設定ファイルで指定したディレクトリを作成。
# mkdir /etc/supervisord.d
supervisor 用の起動スクリプトを clone して設置します。
# cd /usr/local/src/
# git clone git://github.com/Supervisor/initscripts.git
# cp initscripts/redhat-init-jkoppe /etc/init.d/supervisord
# cp initscripts/redhat-sysconfig-jkoppe /etc/sysconfig/supervisord
# chkconfig --add supervisord
このままではデフォルトの設定ファイルと pid ファイルの場所が異なるので、以下を編集します。
# vi /etc/sysconfig/supervisord
ここでは /etc/supervisord.conf 側に合わせたので、以下のように変更しました。
#PIDFILE=/var/run/supervisord.pid
PIDFILE=/tmp/supervisord.pid
これで supervisor の準備は出来たので、Sentry 用の設定ファイルを作成します。
# vi /etc/supervisord.d/sentry.conf
以下のような内容にしました。
[program:sentry-web]
command=/usr/bin/sentry --config=/etc/sentry.conf.py start http
user=sentry
autostart=true
autorestart=true
redirect_stderr=true
stdout_logfile=/var/log/sentry-web.log
指定した起動用ユーザを作成します。
# useradd -s /sbin/nologin -M sentry
supervisord を起動します。
# service supervisord start
Starting supervisord:
sentry-web                       STARTING
これで supervisord 経由で sentory の起動・停止が出来るようになりました。
Nginx の設定
このままでは 9000 番ポートを指定してアクセスする必要があります。
80 番ポートでアクセスできるようにするため、Nginx 経由で Sentry にアクセスできるように設定します。
まずは Nginx をインストール。
# yum install -y http://nginx.org/packages/centos/6/noarch/RPMS/nginx-release-centos-6-0.el6.ngx.noarch.rpm
# yum install -y nginx
設定ファイルを編集します。
# vi /etc/nginx/conf.d/default.conf
location / の設定を以下のように変更しました。
location / {
  proxy_pass         http://localhost:9000;
  proxy_redirect     off;

  proxy_set_header   Host              $host;
  proxy_set_header   X-Real-IP         $remote_addr;
  proxy_set_header   X-Forwarded-For   $proxy_add_x_forwarded_for;
  proxy_set_header   X-Forwarded-Proto $scheme;
}
設定したら Nginx を起動します。
# service nginx start
以上で Sentry のインストールは完了です。
これでブラウザからポート 9000 を付けなくても Sentry にアクセス出来るようになります。
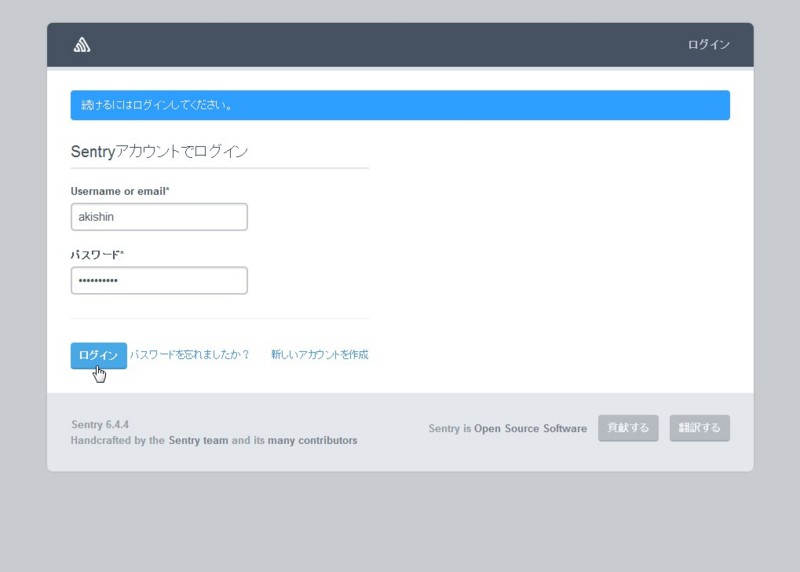
アクセスするとログイン画面が表示されるので、作成したユーザ情報でログインします。
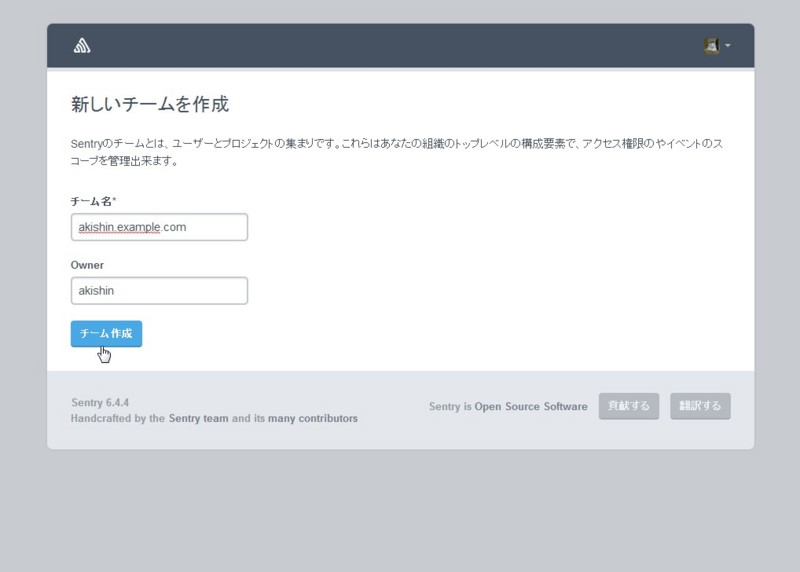
ログインすると、初回ログインではチームの作成画面が表示されます。
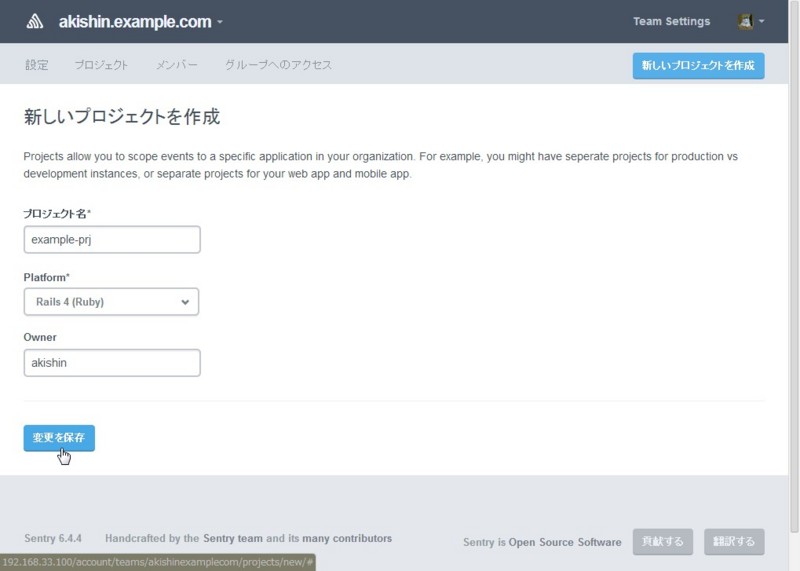
チームを作成すると次はプロジェクト作成画面が表示されます。
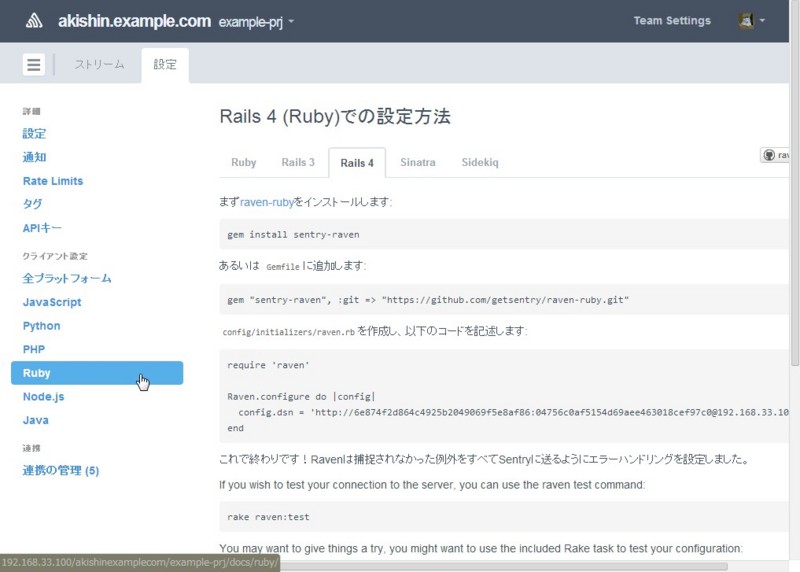
プロジェクトを作成すると以下のような設定画面が表示されます。
商用サービスもあるだけあって大部分日本語化されているようです。
使い易そうですね。
ちょっと長くなったので、実際の使い方はまた次回にでもまとめたいと思います。


